Clarinet Assembly
The clarinet has many different parts, and putting it together can be a daunting task for a beginner. Ideally, it would be best if you wait until your teacher can demonstrate it so that you won't risk damaging your instrument. Please ask one of your parents for assistance the first few times you put it together. By using the following guidelines, you should be an expert in no time.
- Begin by sitting in a chair and setting the case on the floor. It can be difficult to balance it on your lap and put your clarinet together at the same time.
- Make sure that the case is right side up.
- Start by putting cork grease on all of the corks where the pieces will fit together. This will not always be necessary, but is important when you first get your clarinet.
- Remove the reed from its protective case, and put it in your mouth. It will play better if it is wet.
-
Remove the bell and second joint from the case. Carefully twist and push the cork end of the second joint into the bell, turning it back
and forth until it is all the way in.

-
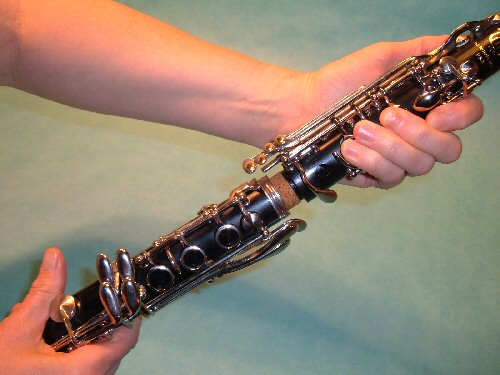
Next, remove the first joint from the case. In the picture below, a black arrow points to the bridge key. This key is very important, and can easily be bent if you are not careful. Hold the first joint in your left hand, with your fingers over the ring holes on the front of the clarinet as shown. This will cause the bridge key to lift up. Holding the second joint close to the bell with your right hand, slowly twist and push the first joint into the second. Look at the picture to see where the two sections should meet. Try to turn it back and forth in small motions, so that the keys don't bang into each other.

-
Remove the barrel from the case and twist and push the large end onto the first joint.

-
Remove the mouthpiece from the case and take off the ligature (the ligature is the metal or sometimes plastic piece that has one or two screws in it). Twist and push the cork end of the mouthpiece into the barrel. The flat side of the mouthpiece should line up with the back of the clarinet (the part with the fewest keys).

-
Slip the ligature over the mouthpiece.

- Remove the reed from your mouth and slide it down between the mouthpiece and the ligature. Line it up so that the tip of the reed
doesn't extend beyond the tip of the mouthpiece. If your mouthpiece has lines on it, slide the ligature down until the top of the ligature is below the top line of the mouthpiece. If your mouthpiece doesn't have lines, slide the ligature down to the point where the top of the ligature is below the bark part of the reed. The ligature screws should be tightened securely enough to keep the reed from slipping, but not so tight that they are difficult to unfasten.


This is the way I assemble my clarinet. However, some people may start at the top with the mouthpiece and work their way down. Either way is fine. In fact, your teacher may want you to start out with just the mouthpiece and the barrel, so that you can practice forming the correct embouchure.